.png?width=660&height=92&name=help-centre-banner-J-2x%20(2).png)
It is built around four things: how much marking you've completed, what is waiting on you right now, the state of every job you have on the go, and anything your school needs to know.
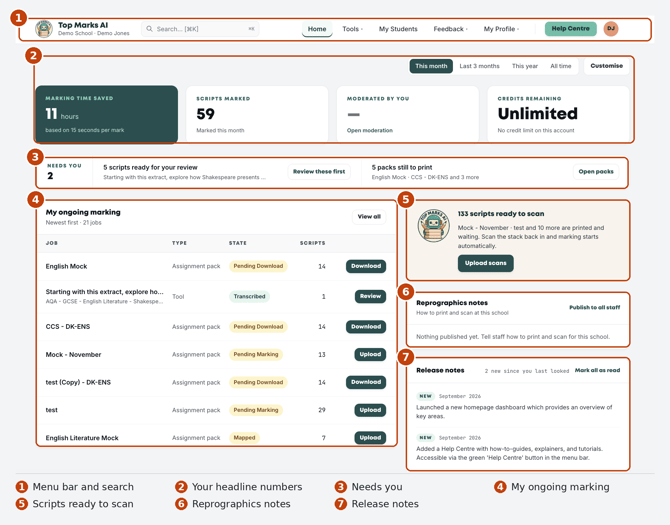
The numbers above match the numbered sections below, so you can find any part of the page by pointing at it.
1. The menu bar
The bar across the top stays with you on every page. Your school name and your own name sit under the logo on the left, so you can always check which school you are signed in to if you are part of a trust.
|
Menu |
What is behind it |
|---|---|
|
Home |
This dashboard. Also reachable by clicking the logo. |
|
Tools |
Tools: over 400 markers organised by qualification. Assignment Packs: printable papers with a QR code per student. My Ongoing Marking: every job and its state. |
|
My Students |
Every student you can mark for. QR codes are generated from this list, so it needs to be right. Import by CSV, add students by hand, or sync from your MIS through Wonde. |
|
Feedback |
My Feedback: every script you have marked. Class Feedback: what a whole cohort could work on. Moderation: adjust marks across a set. |
|
My Profile |
My Profile: name, password and security. My Organisation: staff, credits and MIS sync. Access Management: switch between schools, if you are part of a trust. |
|
Help Centre |
The green button. Opens our guides, explainers and tutorials in a new tab. |
The search box in the middle searches the marker library. Type a board, a subject or a text (“Shakespeare” returns every matching marker across GCSE, A Level and KS3). It does not search students or scripts, so use My Students to find a student and My Feedback to find a script you have already marked.
Bottom right, the green Chat button reaches our team directly. It follows you around the site, so you can raise something without losing your place.
On a tablet or a narrow window the menus collapse into a single button beside the search box. Everything is still there, just stacked.
2. Your headline numbers
Four tiles run across the top of the page. They answer the question most people open the dashboard to ask: what has this actually saved us?

|
Tile |
What it tells you |
|---|---|
|
Marking time saved |
Hours given back, worked out at 15 seconds per mark. The figure under the tile shows the rate used, so you can sense-check it. |
|
Scripts marked |
How many scripts have been marked in the period you have selected. |
|
Moderated by you |
How many scripts you have personally moderated. A dash means none yet. Click Open moderation to go and adjust marks across a set. |
|
Credits remaining |
What is left on the account. Schools on an subscription plan will see Unlimited rather than a number. |
The buttons above the tiles set the period: this month, the last three months, this year, or all time. They change the tiles only; the rest of the page always shows live work, whichever period you pick.
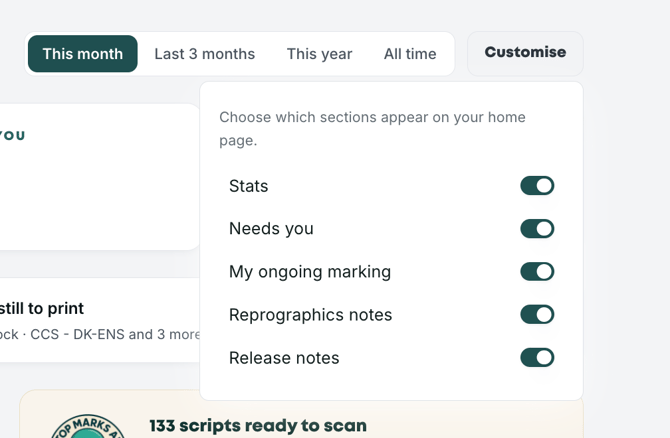
The Customise button beside them lets you switch whole sections of the home page on and off: the stats, the Needs you bar, your ongoing marking, the reprographics notes and the release notes. That choice is yours alone and does not change what anyone else sees. If a section described in this article is missing from your home page, Customise is the first place to look.
3. The “Needs you” bar
Directly under the tiles is an orange-edged strip with a number in it. That number is how many things are currently sitting with you, and it is the part of the page worth checking first thing in the morning.
Each item names what is waiting and gives you a button straight to it. Typically you will see scripts that have been marked and need your review, with a Review these first button that opens My Feedback filtered to the scripts you have not reviewed yet. You may also see packs that have been created but not yet printed, with an Open packs button that takes you to the assignment packs page.

The strip only lists work that is genuinely outstanding, so a short bar is good news. Nothing in it is a deadline, it is simply work the platform cannot finish without a person.
4. My ongoing marking
The table on the left is every job you have on the go, newest first, with a count at the top so you can see the size of the pile.
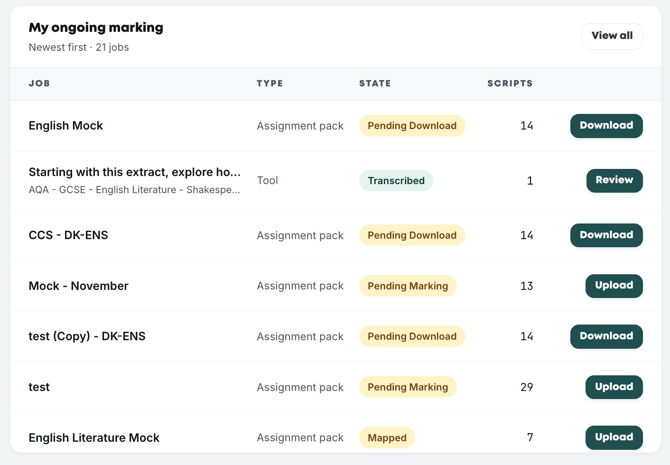
There are two kinds of job. An assignment pack is a printed paper with several questions and a QR code for each student and each question, so scans come back already matched to the right person. A tool job is a single question put through one of the markers directly, without printing anything.
The State column is the useful one. Each state comes with the one button that makes sense for it, so you rarely have to think about what happens next. Just click what you are offered.
|
State |
What it means |
Button you get |
|---|---|---|
|
Unfinished |
The pack was started but never finished being set up. |
Continue |
|
Pending Download |
Ready to print. The PDFs are waiting for you. |
Download |
|
Pending Marking |
Printed and out with students. Scans are still to come. |
Upload |
|
Mapped |
Scans are in and matched to students and questions, with more still expected. |
Upload |
|
Transcribed |
The handwriting has been read and marks proposed, ready for you to check the transcription and the marks. |
Review |
States you were not expecting, and the messages that sometimes come with them, are covered in Upload and Marking Statuses: What They Mean and What to Do. It is the article to reach for when something looks stuck.
A whole pack moves through those states in order:

Only the first, second, fourth and last steps need a person. The platform handles the rest on its own.
The button on the right of each row is an indicator of the outstanding action.
|
Button |
Appears on |
Where it takes you |
|---|---|---|
|
Download |
An assignment pack waiting to be printed |
The pack's own page, where you download the PDFs. |
|
Upload |
An assignment pack waiting for scans |
The pack's own page, highlighting which scripts are missing. Navigate to Tools > Assignment Packs to upload your students' scripts. |
|
Review |
A tool job that has been transcribed |
The transcription box itself with the transcribed work loaded, ready for you to review and proceed to marking. |
Top Top: A pack's page lists every script in it: the reference number, the student it belongs to, the marker it was sent to and whether it has been received yet. That is where to look when one student's paper has gone astray. You can read and download from that page, but you cannot add anything to it.
Uploading scans in is the one job you cannot start from here. Despite the label, the Upload button only opens that read-only page. To upload, go to Tools → Assignment Packs, find the pack in the list and use the Upload button on its row. That opens a Mark Assignment Pack window where you drag the PDFs in. The My Ongoing Marking page has the same limitation: every row there offers View and nothing else.
5. Scripts ready to scan
The panel on the right counts every script that has been printed but not yet scanned back in, across all your packs, and names the packs involved.
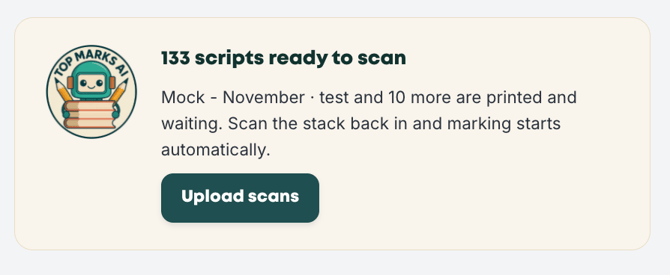
This is the one number that tends to drift. Papers get printed, sat, collected and then left in a pile on a desk, and until they are scanned nothing else can happen. The count is there to catch that.
Upload scans takes you to Tools → Assignment Packs, which is where sending scans in actually happens. Find the pack in the list and click Upload on its row, a Mark Assignment Pack window opens and you drag the PDFs straight into it. Keep the QR codes visible; if they are obscured the scans cannot be matched.
Because every sheet carries a QR code, you do not need to sort the pile, split it by student or upload each paper separately — scan the whole stack in one go and each script finds its own student. Marking starts by itself as soon as the scans land, and the jobs move on to Review without anyone pressing anything.
If you want the detail of how the codes work, see How do Student QR Codes Work. If an upload comes back complaining about duplicate or unreadable codes, Upload and Marking Statuses explains each message and what to do about it.
6. Reprographics notes
Every school prints and scans a little differently; which machine, what settings, where the finished stack goes, who to ask when the scanner jams. The reprographics notes panel is where your school writes that down once so nobody has to ask again.
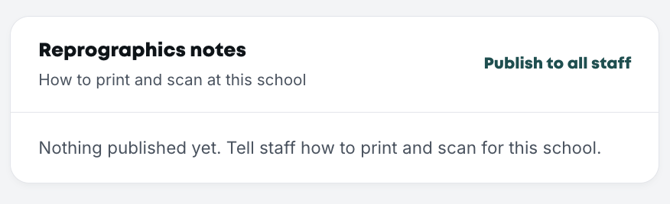
Until someone fills it in, the panel says nothing has been published yet. Whoever looks after printing can write the instructions and use Publish to all staff, and from then on the notes appear on the home page for everyone at your school.
It is worth keeping short and specific: the machine to use, the settings to choose, where the scanned file goes and who to ask if something jams. Teachers new to the school read this panel before they read anything else.
7. Release notes
The panel at the bottom right lists what we have changed, newest first, with a NEW tag on anything added since you last looked and a count at the top. Mark all as read clears the tags.
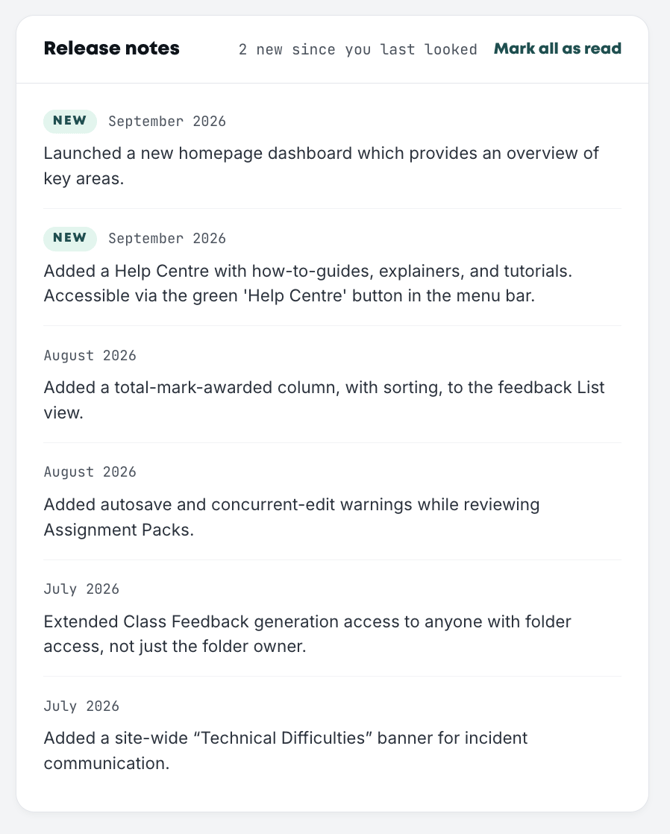
It is a short read and worth a glance now and then — features get added quietly, and this is the only place they are announced. The home page dashboard itself and the Help Centre were both added in September 2026.
If you get stuck
Three things are always within reach, wherever you are on the site.
- The green Help Centre button in the menu bar opens the Help Centre, with guides, explainers and tutorials.
- The Chat button in the bottom right corner puts you through to our team without leaving the page.
- The search box finds a marker faster than clicking through the Tools menu. ⌘K jumps straight into it.
A quick note on two things people ask about often. If part of your home page seems to be missing, check the Customise button before assuming something has gone wrong as sections can be switched off per person. And if a job seems stuck in one state, open it from the marking table and look at the script list inside: nine times out of ten a script has not been scanned back in yet.