.png?width=660&height=92&name=help-centre-banner-J-2x%20(2).png)
Where to Find Your Feedback
Everything lives under Feedback in the main navigation, which has three sections:
- My Feedback – individual student reports, and the folders you use to organise them.
- Class Feedback – whole-class summaries generated from a set of marked scripts.
- Moderation – bulk adjustments to marks across a set of scripts, with a full audit trail.
Feedback lands in My Feedback as soon as each individual student's marking is complete. It does not wait for the whole cohort to finish, so you can start reviewing results straight away. It also means that if one piece of student work fails to mark, for whatever reason, it will not hold up or interfere with the rest of the class.
My Feedback
Go to Feedback → My Feedback from the main navigation. You will see two things: folders at the top, and individual loose feedback tiles below.
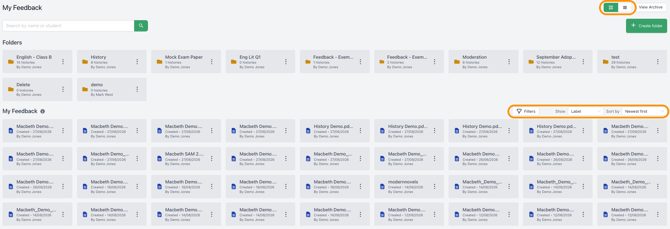
There are several ways to filter and adjust this view:
- Search: the search box at the top of the page searches by file name or student name
- Icon view and list view: using the two small buttons in the top right, google between icon view (default tile layout with folders viewable) and list view (a sortable table showing every piece of feedback with more granular information for each, such as marks and moderation history)
- Top Tip: if you want an at a glance overview of marks across a whole cohort without downloading anything, this view is a quick way to achieve that
- Show: changes what each tile is labelled with: Label (file name), Student (student name), etc.
- Sort by: newest first, Students (A-Z), or Tool (A-Z).
- Filters: this button opens the full filter panel, where you can narrow down by date, student, school year, assignment pack, tool, moderation, etc. Click OK to apply, or Reset to clear all filters.
-
- Top Tip: filtering by School Class and then switching Show to Student is the fastest way to get to one teaching group's results
Open a piece of feedback by double-clicking its tile. The report opens in a window with the student's name, class and year group at the top, alongside their final score, all applied automatically via the QR code system or exam decoder.
The report is organised into three parts:
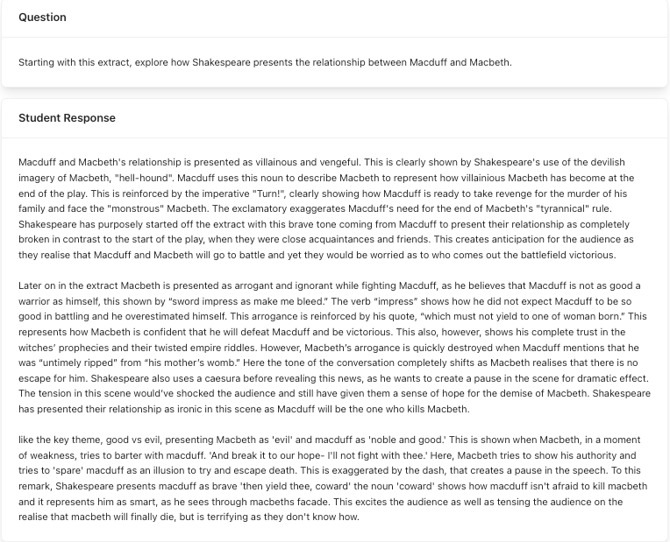
Part 1: Question & Student Response
The full question or essay title the student was answering, followed by the transcribed student response.
Part 2: Feedback
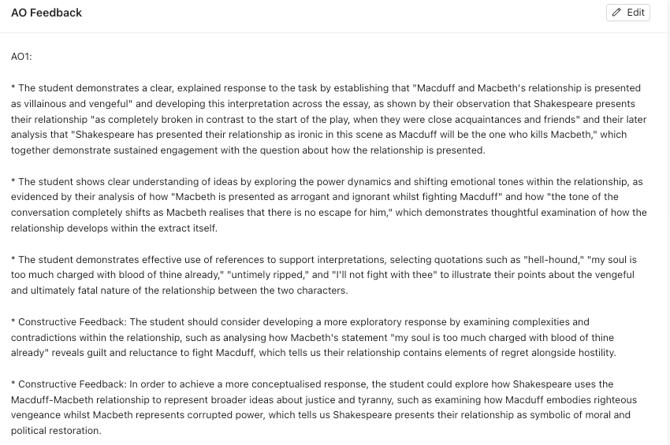
AO Feedback breaks the response down by each individual Assessment Objective, covering what the student did well, with direct quotation from their own writing as evidence, and clear constructive next steps to reach the next attainment level. Every student gets this level of detail for every question – something that simply would not be possible to produce by hand.
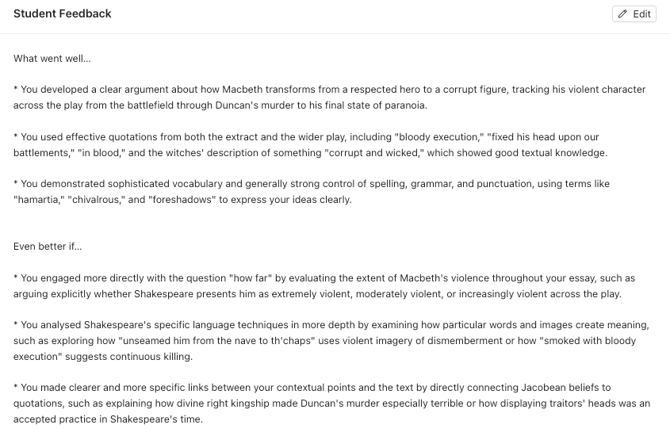
Student Feedback presents the same information in a more digestible form: three "What went well…" points and three "Even better if…" points, written in the second person and addressed directly to the student. This is the section most schools share with younger year groups.
- Top Tip: you can read more about the pedagogical underpinnings of our feedback at topmarks.ai/scamp-feedback.
Part 3: Numeric Grade
Numeric Grade gives the score for each Assessment Objective and the final overall score.
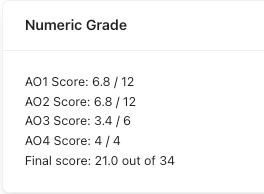 Note: The scores may show as decimals, which is expected behaviour. This is because several specialist AI markers look at each student response independently, and the final score is an average of those decisions. That irons out any differences of opinion between the markers.
We show you the average rather than rounding it ourselves because every school approaches rounding differently. One will see a 6.8 and round up to a 7; another will decide they haven't quite met the criteria and call it a 6. Leaving the decimal in keeps that call with you.
Editing feedback before you share it
You are always the professional in the loop. Both the AO Feedback and the Student Feedback sections have an Edit button beside them. Click it, make your changes directly in the text, and click Save (or Cancel to discard).
Teachers most often use this to add a personal line to a particular student, to soften or sharpen a target, or to reference something covered in class. Edited feedback is flagged in the system, and when you download a CSV you can include an Edited indicator column so a head of department can see at a glance which reports have been adjusted by hand.
Using Folders to Stay Organised
Folders are the best way to keep your feedback organised, particularly if you are managing multiple classes or subjects. You can create folders by class, by department, by assignment, or however works best for you. Folders also unlock batch export, so it is worth getting into the habit early.
Creating a folder
Use the green Create folder button on the My Feedback screen. Give it a name and it will appear at the top of your feedback screen. You can also create folders inside a folder if you want a second level of organisation.
Adding feedback to a folder
Select the tiles you want to move and drag them into the relevant folder. To select several at once, hold Cmd or Ctrl and click each tile individually, or click the first tile in a range, hold Shift and click the last. You can then drag the whole selection together.
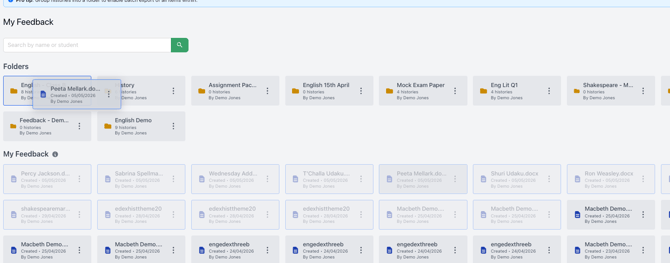
Top Tip: changing from grid view to list view can make it easier to move feedback into folders.
Viewing feedback within a folder
Click into a folder to see all the feedback it contains. From here you can open a piece of feedback and navigate between individual student reports using the previous and next buttons. The same search, Filters, Show and Sort by controls are available, and the breadcrumb at the top left takes you back to My Feedback.
Renaming, merging, archiving and deleting
The three-dot menu on any folder tile (or the … button beside Download All when you are inside a folder) gives you the full set of folder actions:
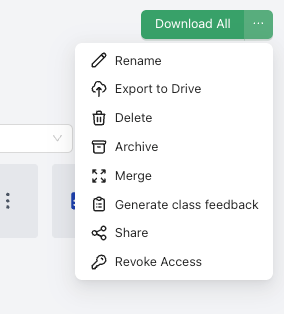 Rename: change the folder name.
- Merge: combine two or more folders into one. Give the merged folder a name and select the folders to bring together. Useful at the end of a unit when you have been working in several smaller folders.
- Archive: move a folder out of your main view without deleting anything. Archived folders live behind the View Archive button in the top right of My Feedback, where you can Unarchive or permanently Delete them. Archiving is the right choice at the end of a term or academic year.
- Delete: remove the folder permanently.
Sharing a folder with colleagues
Choose Share from a folder's menu and select the colleagues at your school who should be able to view it. This is how most departments handle moderation samples, second marking and handovers; once shared, the folder appears in the other teacher's account without anything needing to be downloaded or emailed.
To stop sharing, open the folder and choose Revoke Access from the … menu.
Downloading Feedback
Downloading a folder of feedback
Inside any folder, the green Download All button is the most commonly used option. It opens a dialog where you choose:
- Format: either Word ZIP (every piece of feedback as its own editable, printable Word document, bundled into a zip file) or CSV (a single spreadsheet with every student laid out in rows, which is ideal for an at-a-glance overview of scores or for sharing with a head of department).
- Sections to include: tick or untick Question, Student Answer, AO Feedback, Student Feedback, AI Plagiarism Score, AO Scores and Final Score. If you only want to hand students the summary and their final mark, untick everything else and the downloaded documents will contain just that. CSV downloads offer one extra column, Settings, which records the marking settings used.
- Customisations: Round Final Grades to Nearest Integer is useful when you are transferring marks into a school system that will not accept decimals. For Word downloads, Feedback Grouped by Student puts all of a student's reports together rather than one document per script. For CSV downloads, Include Edited indicator column shows which reports have been edited by hand.
- Classes to display on document: where a student sits in more than one class or set, this controls which class name appears on the printed report.
Downloading a single feedback file
Open any report and use Download to Word. You get the same choice of sections, plus the rounding and class-name options. You can also use Download to Word from the three-dot menu on an individual tile without opening it first.
Downloading the student's original response
Download Student Response on a feedback tile's three-dot menu gives you just the transcribed student answer, without any of the feedback.
Sending feedback to Google Drive
Export to Drive is available on both individual tiles and whole folders, and sends the documents straight to your school's Google Drive rather than downloading them locally. You will be prompted to connect your Drive account the first time you use it.
Whole Class Feedback
As well as individual student feedback, Top Marks can generate feedback at class level. Go to Feedback → Whole Class Feedback to see previously generated class feedback, or click Create Whole Class Feedback to generate a new one.
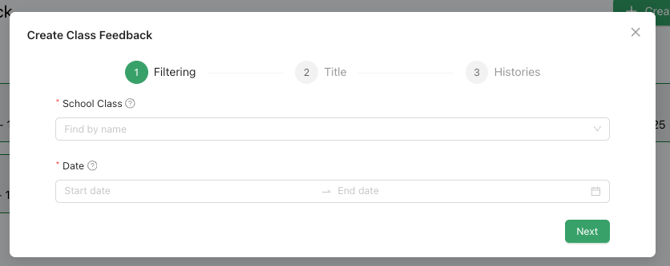
Creating class feedback
There are three steps to follow:
- Filtering: choose the school class and the date range you want to cover.
- Title: select the essay title to summarise. Class feedback is generated for one question at a time so that the comparison across students is meaningful. Similar titles are grouped together, so you do not need to worry about small differences in how a question was labelled on upload.
- Histories: every matching script is selected by default. De-select any you do not want included, for example a student who was absent for the assessment or sat a different paper.
Note: You need at least two scripts to generate class feedback, and it costs one credit for every five scripts included. The running total is shown to you before you generate.
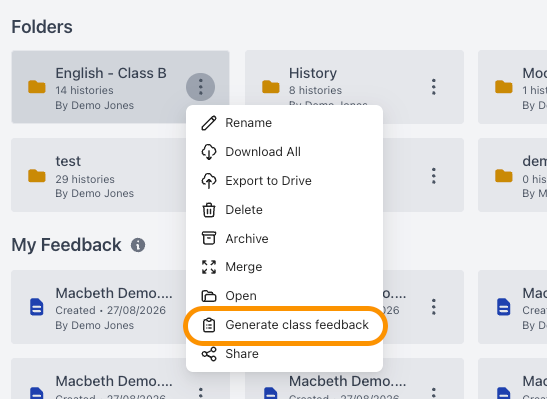
Top Tip: You can also start this from a folder in the My Feedback section: choose Generate class feedback from the folder's three-dot menu. Because the folder already defines the set of work, this route skips the filtering step and takes you straight to choosing the essay title.
What a class feedback document contains
- Summary: the class, the date range covered, and the students included.
- Essay Title: the question the summary relates to.
- What Went Well: the strengths that came up repeatedly across the class, each illustrated with anonymised examples of what individual students actually did.
- Even Better If: the common gaps, each with a weak example from the cohort alongside an improved version and an explanation of why the improved version is stronger.
Those paired weak-and-improved examples are designed to be lifted straight into a lesson, and many schools use class feedback to identify common gaps and plan the following week's teaching around them.
Top Tip: From an open class feedback session you can Download to word, send it to Google Drive, or delete it.
Moderation
Feedback → Moderation lets you apply a consistent adjustment across a whole set of marked scripts. For example, reducing AO1 marks in the top band by one mark where the marking has been generous. Each moderation session records every essay's mark before and after, and any adjustment can be reverted individually.
Moderation is covered in full in its own help centre article, here.
Fixing things that aren’t quite right- Tag student: if a script did not pick up a student name from its barcode, use Tag student on the tile's three-dot menu (or inside the report) to attach the right student. Once tagged, the feedback will appear correctly in filters, class feedback and exports.
- Rename: give a piece of feedback a clearer label than the original file name.
- Report an issue: if a mark or a piece of feedback looks wrong, use Report an issue on that specific report. This sends it directly to our team along with the underlying script, which is much faster for us to investigate than a description over email.
Sharing Feedback with Students
Feedback reports are designed to be handed directly to students. Many teachers share them digitally via their school's learning platform, or print them to return alongside marked scripts.
Top Tip: If you are giving reports to younger year groups, consider downloading with only Student Feedback and Final Score ticked – it keeps the document to a single, readable page.
Still unsure? The support chat in the bottom-right corner of the website connects you directly to a real person on the Top Marks team – not an AI bot, ironically! Don't hesitate to reach out at any point.